Tuesday, July 31, 2012
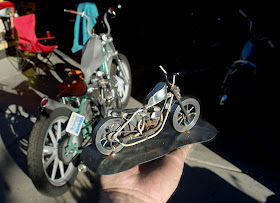
Mini-Me Ironhead
Was doing some work on the Econoline axle bearings when I looked at the old parts and decided they could be put to use as a sculpture. Then I figured, "why not a replica of the chopper?". So, we ended up with a miniature version of the Ironhead when all was said and done! Next up: Danny's XS650....
A visitor from a far off land-
We had a great visit from Takamitsu Yashiro from Blue Groove (http://bluegrooveshopblog.blogspot.com/) who was in Reno buying a Panhead- great to have have visitors stop in and check out our work, see you soon, Taka!
Friday, July 27, 2012
Wednesday, July 25, 2012
Monday, July 23, 2012
One of the exhaust clamps on the Ironhead was stripped, and when we priced a new one it made my head explode! POPPYCOCK! $15 for a new set! Ha! We'll make our own! And how glorious they are- super thick and with some really fancy grooves to go with the rest of the bike. You just can't put a price on custom, literally, as these are not available in any catalog.....
Sunday, July 22, 2012
3 new additions- done?
Headlight first and foremost turned out KILLER! Transformed the bike completely, along with the new front rollpfender- combo skid plate, roll pan and fender. I was inspired by the speedway style, but combined the frame mounted guard with the little fender to form one clean piece. Also you will notice the leather grips to tie in with the seat. One last addition for this version 1.0 will be custom machined rocker nuts of aluminum to go with the other pieces Danny has machined with a Deco look.


Monday, July 16, 2012
Best Rack Ever?
Of course, look what it's stocked with! And for FIVE dollars no less. Some people just don't know a killer deal when they see one.
Sunday, July 15, 2012
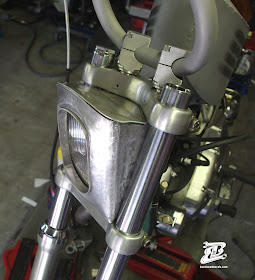
Shedding some light
(I already used "Let there be light"). Headlight bucket finished for the Ironhead. This was actually rather intensive, spent more time tweaking and finishing this to a higher level than most other parts on the bike, and it really came out better than I had envisioned. And I learned I have a shit-ton more to learn about aluminum welding..... Lots of little bits to think about from how it mounts, to filling the backside, to where the switch and circuit breaker go, etc. last piece to be done will be the mounting blocks for the top front side that will screw into the holes in the top triple, formerly where the gauge mounts use to be til we whacked them off.
Thursday, July 12, 2012
Let there be light!
Bouncing all over the place today, Danny's machining, I'm making a new headlight housing because the round bucket never looked good with that tank and oil bag, even after blasting. Most of the bike is square and hard edged now, needs a light to go with that style......
Tuesday, July 10, 2012
Take a seat
wasn't exactly sure how I would feel about the leather seat, whether it would go with the austere and cold bare metal. The formed aluminum seat did look killer. But, now that it is on there it really kicks the bike up- and with the leather grips to match it will REALLY look complete, maybe even a small tool case for underneath the oil tank.
Not bad for a FIRST attempt ever at a scratch built pan, hinge and tooled seat.......
Not bad for a FIRST attempt ever at a scratch built pan, hinge and tooled seat.......
Machining Moderne
Danny machined these simple but ri-donk-ulously complicated art deco risers for the Ironhead. Completes the top of the streamlined triple perfectly!
Next up: fork legs......
Friday, July 6, 2012
*Cough!*
*Pow!* * Spit!* (I'm just guessing that is what it will sound like, being an Ironhead and all). But, at least it will look snazzy doing it!
Not entirely sure if this air cleaner assembly merited as much effort as went into it- 3 days to be exact (to form and weld the top, drill and channel it, make the back half fit up to the top half exactly, weld a box on the back that bolts to the carb, and form the stainless mesh into a dome inside). But, it's done now and at least matches the bodywork and accents of the bike much better than the round cleaner. In retrospect I would have made the base FIRST, and made the grill cover out of aluminum strips or rods. Instead, we formed flat aluminum sheet, then drilled and cut out every channel. Not a wise use of time IMHO.
Oh yeah, and in doing some final welding I burned through the bottom edge, and had to graft on an entire new piece to wrap under, but you'd never know had we not told you!
Tuesday, July 3, 2012
In progress.....
Leather seat for the Sporty. Sad thing is I am not even sure if we will run this at all, as the raw aluminum pan goes with the look of the bike so well. But, too much time invested to quit now!


